Watercolor Painting – Woodland Landscape


Watercolor Painting Artist Statement – Painting & Printmaking

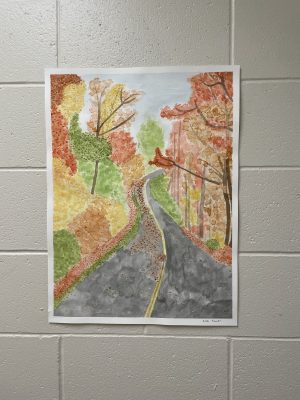
My watercolor painting is a fall day after it had rained with leaves. The setting is a road that is curving with a wet effect with leaves laying on it. There are trees making almost a tunnel effect over the road, but there is still a pale blue sky. The trees are made up of bright and vibrant colors such as yellow, orange, a strong red that has a pinkish tint to it, and green. There are two textures of leaves throughout it and I would say a good variety of colors. Some branches and trunks of the trees are more of a solid brown indicating that it would be closer to you and the ones that are more faded causing a further distance look to it. 

The Intended meaning of my painting was to just enjoy looking at it. I chose a good fall vibe picture to go off of and enjoy creating it into my own. I wanted it to draw people’s attention and give them a happy feeling when looking at it. Joy, happiness, and comfort was my intended goal for this watercolor painting. 

I created this painting with watercolor, smaller sized paint brushes, water, and a photograph. When sketching this out I used a pretty light pencil for any mess ups so I could erase easily. One of the techniques I used to darken a color instead of just having a ton of pigment was to layer colors, with this it helped to give a nice leafy look to it. Some areas stayed lighter while others would get darker over top of the original layer. Another technique I used was to have a ton of small dots pile up on one another so also make a cool leafy look. This one took the longest but with the different techniques it added good texture and contrast. 

Some elements in my artwork to support my intended meaning would be the colors of my trees. All of the different shades of each individual color also brought out a good contrast. I really enjoy how welcoming this painting makes me feel. 

The thing I would probably do differently when painting this again would be first the time management I gave myself, and also how I went about the leaves. The leaves alongside of the road could look a little better and I would try harder to make them look better and less sloppy. 

A good goal after looking and working on this painting for the future would probably be to just trust the process. I kept saying how much I disliked this painting as I was working on it and that honestly could have been a good factor into why I pushed it off. In the end I got a lot of compliments and ended up finding good things to point out in it. 

Recipe & Reflection

Recipe: Chicken Alfredo

Ingredients:

  • 3 tbsp extra-virgin olive oil
  • 2 boneless skinless chicken breasts
  • 1 tsp salt & 1 tsp pepper
  • 1 1/2 cup non fat milk
  • 1 1/2 cup low sodium chicken broth
  • 4 cloves garlic
  • 8 oz fettuccini
  • 1/2 cup evaporated milk
  • 1 tbsp parsley
  • 1 cup fat free or low fat parmesan cheese

Directions:

  1. In a large skillet over medium-high heat, heat oil. Add chicken and season with salt and pepper. Cook until golden and cooked through, 8 minutes per side. Let rest 10 minutes, then slice.
  2. Add milk, broth, and garlic to skillet. Season with salt and pepper and bring to a simmer. Add fettuccine, stirring frequently for about 3 minutes. Let cook until al dente, 8 minutes more.
  3. Stir in heavy cream and Parmesan until combined. Simmer until sauce thickens.
  4. Remove from heat and stir in sliced chicken. Garnish with Parsley, heat for a few more minutes, then serve.

Reflection:

In foods and nutritions, we had many times that we would cook. Each time that we would cook it would fit with whatever unit or topic we were learning about. For the recipe above, we were learning about substituting fats and making recipes healthier. We found the recipe for Chicken Alfredo online and when looking at the ingredients chose a few things that could be substituted for things a little bit healthier options. For example we used evaporated milk instead of heavy cream and low fat milk instead of whole milk.

Things that went really well was the process and Ella, Abby, and I  all worked really well and efficiently together. The flavoring all tasted great and you couldn’t even taste that we substituted different substances for something healthier. Some things that I learned was that you want to make sure you have everything ready and that you should make sure that you give yourself enough time. For example, when you know you are cooking pasta you want to make sure that you boil your water first thing so that while that is getting ready you can start on the rest of the things you need to make. I give this a 10 out of 10, it tasted great and wasn’t difficult to make. My only recommendation is instead of cooking the pasta in the sauce, cook it in water and then mix it all together. When cooking it in the sauce it takes twice as long to cook or they don’t get fully cooked all the way.

Video Editing Project

My last project for Multimedia is a video editing project. We were given the option to choose any type of video of our pleasing to make, the only thing is that we have to film all of the footage. For my video I chose to video tape my moms best friends wedding and the preparation for it. I apologize for part of the footage being vertical, I know it will ruin the affect of the video.

Enjoy watching Amanda go from Chadwick to Mettscher!


8th Grade 2025 Music Video – Multimedia Apps

Hi I am a sophomore at Lincoln Lutheran and I made this music video in my multimedia applications class. I decided to chose the song Come On Eileen for this video not only for extra credit, but because I enjoy the song, and it is in one of my favorite movies. I am most proud of the moments when I slow down the clips or sped them up. I also really liked the part were Gavin moved his shoulders to the beat of the song. Some parts that were a little bit challenging was when the clips didn’t really go to the beat of the song, but I’m pretty sure I made it work. If I could do the project over again, I would probably try and use a few more affects and maybe choose a song that wasn’t as long and one that the kids can relate to when looking back on the video.

Watch my video here:

https://drive.google.com/file/d/1Atk4T-E7pmoJMJO7_t4uai8zRnyuxmab/view?usp=sharing

Ceramic Bowl Artist Statement

Ceramic Bowl Artist Statement

I am posting my artist statement for my ceramic bowl project from my art class, the class that I am in is Introduction to Visual Arts. Mrs. Seitz has us post our art work on our website to show what we do and the process we take when doing it. We put a lot of time and effort into it, I hope you enjoy reading about my ceramic bowl process and looking at it.

My artwork is a ceramic bowl with two colors of glaze, on the top rim it is a matte yellow, the bottom and the middle is a speckled white. The bowl matches the matching mugs that I made last year during Ceramics 1. The title of my bowl is speckled with happiness. The most obvious elements in the project would be shape, looking at it you can see the structure and how it was put together.  Another would be texture, you can see that the white speckle is shiny and looks smooth but when you look at the yellow you can see that it isn’t shiny and feels less smooth and less soft. 

The tools that I used for this project was a needle tool, smoothing tool, a sponge, painting brush, and a spray bottle. The process I used to make this was we started out with choosing the outline of it, we had a small square on the bottom. But we didn’t just cut out the square, we took an even bigger square of clay and then cut in lines coming from the corners of the small square in the middle. With this we carefully brought the four pieces up and smoothed them together in the form of a kind of square bowl. From there we stamped in words that described or reminded us of the year of 2020. After we put it into the kiln we picked out our glazes to put on. Each section of the part we glazed took three coats, then we put it into the kiln for one last time and when it is done you are finished. 

What inspired my artwork was just the fact that I already had mugs that were matching so I thought that I could put one more thing to match them. My project does not represent a social or personal issue. I genuinely didn’t show much emotion in this project mainly because ceramics isn’t really my thing. 

For me my goal as an artist is to be able to draw or sketch the realistic parts of a face. Over the summer I worked on sketching eyes, but one eye took me up to forty-five minutes. This piece didn’t really help me to try and reach or achieve my goal, but on my next piece I hope to attempt at part of my goal.

The final piece was a lot of what I expected, the only thing that I didn’t think was going to work out was glazing the bottom, but it worked out good. What kind of changed last minute was the fact that I put my quote on the inside of my bowl instead of on the bottom. 

Line Art Project & Artist Statement

I am posting my artist statement for my line art project from my art class, the class that I am in is Introduction to Visual Arts. Mrs. Seitz has us post our art work on our website to show what we do and the process we take when doing it. We put a lot of time and effort into it, I hope you enjoy reading about my line art process and looking at it.

My artwork looks like different shapes all randomly scattered on a piece of paper. It is full of the color purple and you can see a good amount of yellow and green as well. I titled my artwork Fizzy Pop. You can most visibly see value and lines. 

The media of my portfolio is made up of circles of all different sizes and some triangles. I used different stencils to draw these objects out. The process of this project started with us drawing random lines on a piece of paper until we are pleased with the outcome. You will do that two more times and will have three different layouts of designs, you will choose which one you like the most and make three photo copies of it. Once you have them you get to lay them all out together to have the matching corners meet on the inside. You can make four different designs out of it and then you choose which one you like best. You then tape all of the pieces together and trace them out onto another piece of paper. Then you have your new design and can begin to color it. 

As we were drawing these little pieces of art we were listening to music and the music I was listening to gave me this 70’s and 80’s vibe so that’s why my artwork looks like that. I think I drew it like this because I love the 70’s and 80’s and I wish that I could grow up to enjoy that time and style. I showed happiness in my artwork with the bright colors that I chose. 


For me my goal as an artist is to be able to draw or sketch the realistic parts of a face. Over the summer I worked on sketching eyes, but one eye took me up to forty-five minutes. This piece didn’t really help me to try and reach or achieve my goal, but on my next piece I hope to attempt at part of my goal.


Portfolio Cover & Artist Statement

I am posting my artist statement for my portfolio from my art class, the class that I am in is Introduction to Visual Arts. Mrs. Seitz has us post our art work on our website to show what we do and the process we take when doing it. We put a lot of time and effort into it, I hope you enjoy reading a looking at my portfolio.

My artwork has a border around it and on the inside, three quarters have little hexagons everywhere. There are a couple of hexagons that are filled in with black sharpy and the rest just have a black outline. On the quarter of the portfolio that doesn’t have the hexagon shapes, has mine name looking as though it is being traced from the trail of a bumble bee. I named my portfolio art piece “honey.” You can see shape and line very obviously in my portfolio. 

In my art portfolio I traced a printed out copy of a hexagon to get that honey comb kind of effect. The process started out with finding the desired size and then cutting it out, then I proceeded to trace it out onto a notecard to make the tracing paper thicker. After I had my stencil type thing, I began to trace out all the hexagons. When I had finished all of the tracing/outlines of the shape, I then went through and traced over them with a fine point sharpie. 

When I am bored or feeling artistic, I go on pinterest and see these cute paintings that I want to do in the future and I saw some honey comb looking sketches that drew my attention. Not necessarily, if you looked at it in a certain way you could perceive it in a way that comes across as saving the bees, but not really. In this particular piece there wasn’t much emotion behind it besides that fact that I felt mesmerized by the honey comb as it formed. 

For me my goal as an artist is to be able to draw or sketch the realistic parts of a face. Over the summer I worked on sketching eyes, but one eye took me up to forty-five minutes. This piece didn’t really help me to try and reach or achieve my goal, but on my next piece I hope to attempt at part of my goal. 

What I learned from this project was that small precise things take a long time and you have to be patient because the process might be a little rough or shaky, but the outcome might be amazing. Honestly the final piece turned out to be a lot better than what I expected, I was kind of hoping that we would be able to use color so I could make the border almost look like dripping honey, but I can save that for some time else. This piece will help my further projects, because this will help me to challenge myself to try harder and to achieve my goal sooner rather than later.

Speech Outline

Hattie Bennett

English 1 Block 2

Mrs. Duitsman

August 26, 2019


Three Objects That Make Me, Me


Good morning, I’m Hattie which I bet you all know. Today I’m going to be talking about three sentimental objects that explain who I am and who I have become. 

For my first object I brought my necklace, it is key that says the words “courage”. I bought this necklace for my grandpa a year ago while he was battling cancer and he never took it off unless he had to for medical reasons. The night he passed away, my grandma handed it to me and I’ve always had it with me since. My grandpa was a huge part of my life and when he was diagnosed with cancer my family was devastated. 

I brought my goggles for my second object. My goggles represent my love for swimming. I am always in the water during the summer, if its practice or for fun. If you look at them they have lots of scratches on them and that shows just how much I use them and how I’m constantly in the water. I’ve been swimming since i was about 5, I wasn’t even in swimming lessons for one summer before I switched over to swim team. 

Then their is my third object which is my roller skates. These are a few years old because I haven been able to go to the skating rink since it was torn down. These mean so much to me because it was part of my younger childhood and its part of me growing up. My mom worked at the skating when I was born and so I was always at the rink, when I learned how to walk the next thing I learned to do was skating. My mom ran the skating rink, my dad worked their for a little while, my aunt and uncle both worked their and so did both my grandma and grandpa and also my great grandma. We had a family their and about a month or so ago we celebrated my grandpa’s birthday and we got everyone who worked their and was part of our “family” together and we skated in honor of him. 

Thank you for listening to me talk about my objects and what they mean to me. I hope that I can get to know you better and see the things we have in common. 

“Thank you for listening to a little bit about me. I hope that I get to know some of you better through your speeches” .